[Version 0.21 of 2002-05-26]
What's
new? Here is a brief history of the
glossary.![]() Es
gibt demnächst auch eine Deutsche
Version (in Vorbereitung!)
Es
gibt demnächst auch eine Deutsche
Version (in Vorbereitung!) ![]()
Hi, my name is Wolfram (DerWOK)!
This
page is for all the people who are (like me) digging into the great
3D character animation package „Animation Master“
from Hash Inc.
Unfortunately the topic of 3D character animation is quite complex
and the learning curve is quite steep. What makes it even more
difficult is, that the 3D gurus sometimes seem to speak their own
„language“, full of strange terms. And so the A:M software
package here and there uses terms where beginners (like me) know the
word – but not the meaning related to A:M or 3D. This page lists
some of these terms (sure never all of them) and tries to explain
them – and here and there adds an example image or movie.
So the A:M professionals might find this webside quite boring – on the other hand: people who start learning Animation:Master or people who know other 3D packages or people who need help in deciding whether to buy A:M, or not – all these groups of users might find „The Animation:Master Glossary“ of interest – because the glossary is also some sort of „feature overview“. If you have comments, or found a mistake - drop me an eMail.
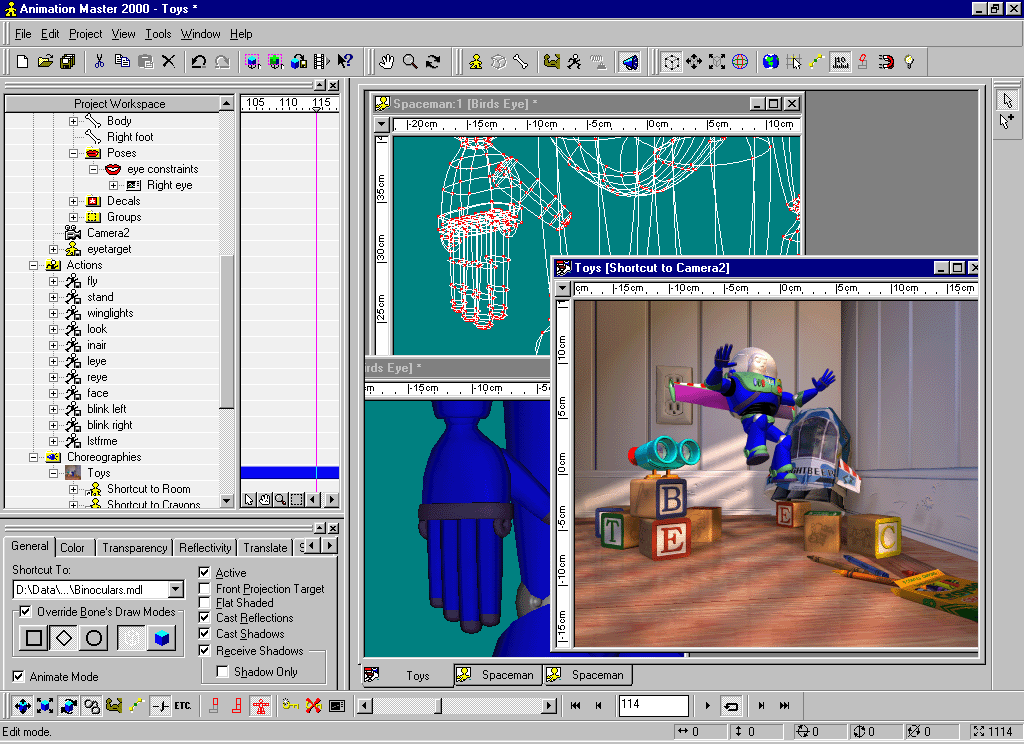
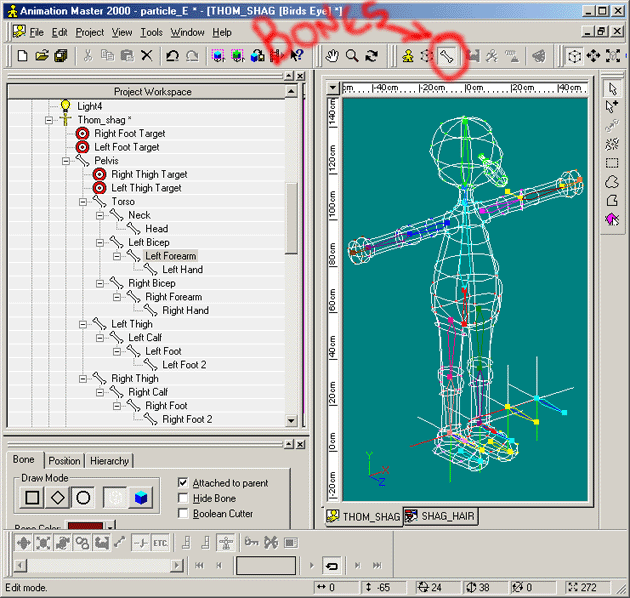
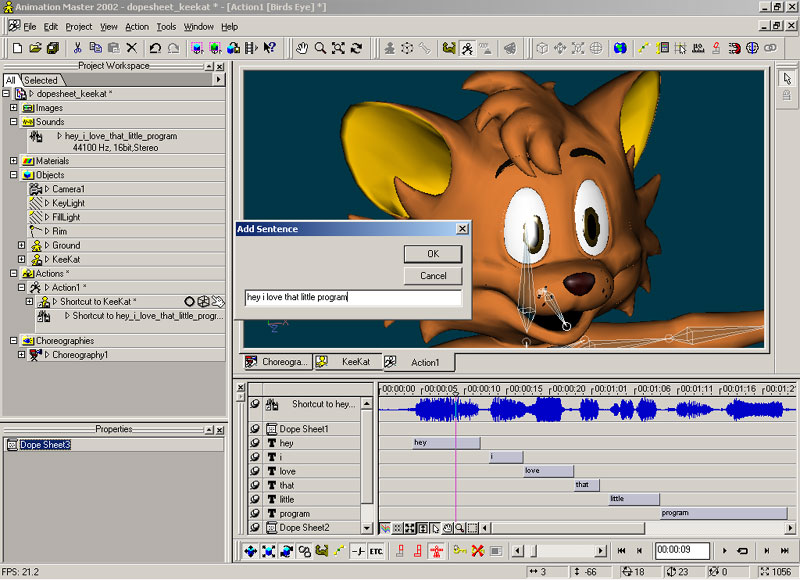
>>> Here
is a Screenphoto of A:M2000
at work.
>>> Hint:
You can find lots of A:M
tutorials at Sherwood Forest.
>>> Hint:
There also exist a huge FAQ-Page
for Animation:Master at Hash Inc.
|
Attention! |
|
Hint: The Terms in
the first column are always |
A:M Glossary
Top-Index
0-9
A B C
D E F
G H I
J K L
M N O
P Q R
S T U
V W X
Y Z
|
Term |
Explanation |
Example |
|---|---|---|
|
|
||
|
Three-Point Patch. Even patches build with only three control
points will render. But sometimes they may show wrinkles and
creases in one corner. So try to avoid them – unless you
need the creases (e.g. at the edge of a mouth or eye of a
model). |
|
|
|
Four-Point Patch. A normal surface patch has four surrounding
control points. |
|
|
|
Five-Point Patch. An area surrounded by exactly 5 CPs on at least 2 different splines only renders as a patch, when you select the 5CPs and press the „Make 5 Point Patch“ Button. But they might show up creases at render time so they are best used at flat areas of your Model. See Patch. |
|
|
|
Action, Action_Blending, Action_Overloading, Alias, Alpha_Bias, Alpha_Channel, AM_Loft, Angle, Animation_Master, Anime_Renderer, Anti-Alias, Audio |
|
|
|
Simple or complex movement of an object e.g. walk, jump,
pickup a ball, light a cigarette, .... Actions can be reused
between different Models with the same
Bone_Hierarchy. Actions are then
combined inside a Choreography to
very complex interactions. Multiple actions in a choreography can
be overlaid and blended. |
|
|
|
Blending between more than one action inside a choreography
when two (or more) actions are applied at the same time to one
model. |
|
|
|
Overloading one character with many simple actions to build a
complex action. Overloading occurs, when two (or more) actions
appear at the same time on the same model in a Choreography.
When two overloaded skeletal actions want to move the same
bone, the later applied (lower in PWT) action
wins. When two overloaded muscle actions want to move the
same Control_Point they simply add
up and move the CP further. |
|
|
|
Alias happens in pixel images when scaling them down. There
are strange artifacts or jumps in thin lines and smooth lines
tend to show up „steps“. So final renders look more
smooth when anti-aliased. But use aliased renders for game
sprites. |
|
|
|
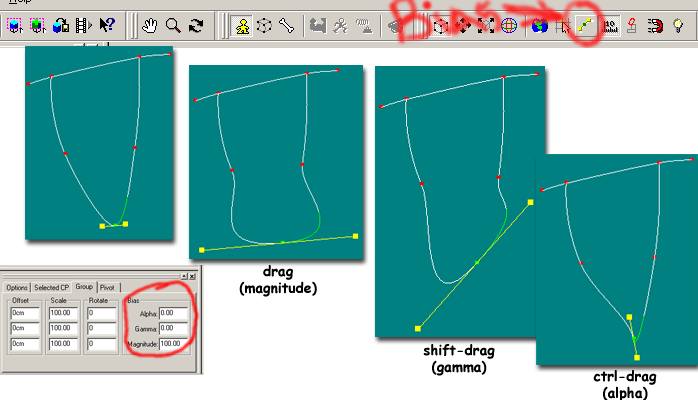
Change the way, how a spline (or splines) run through a
control point. Either select a control point, and edit its alpha
bias in the Properties_Window.
Or show the Bias Handles and mouse drag (with pressed CTRL
key) the handles. |
|
|
|
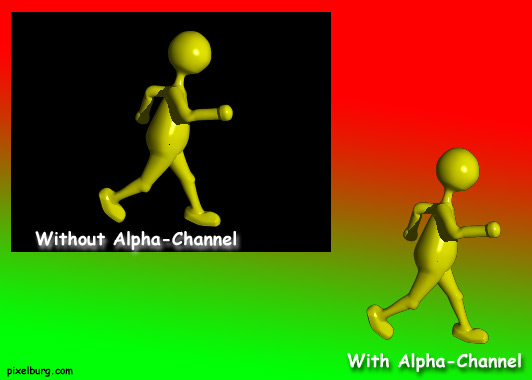
Aka „Transparency Channel“. Extra information
(mostly one extra byte per pixel, so a 24-bit image becomes
32-bit) stored inside a pixel image to tell other programs how
transparent this pixel is, so how much background shines through
this pixel. A:M can load images with alpha channel (e.g. TGA
format) for decals. And A:M can store rendered animations (e.g.
TGA) with alpha channel. You can use this feature to combine your
rendered image sequence inside a video software together with
filmed real world live action. |
|
|
|
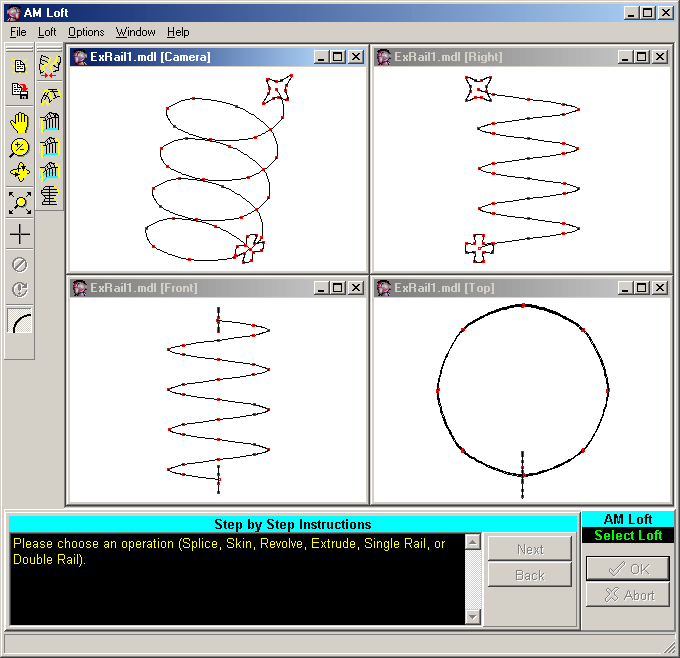
Lofting means to blend one spline over some in-betweens into
another spline (with different shape, but same number of
Control_Points). |
|
|
|
Some of A:Ms functionality is controlled via „Angles“.
For example the rotation of a leg bone during a dance action
(sure also you can edit this by mouse dragging the bone!) or the
spherical limit in a bone constraint (e.g. the human knee can't
bend forward). There are different kind of angles – some of
them are more readable by humans, some of them interpolate more
smoothly when calculated by the software. |
|
|
|
If you read this page, |
|
|
|
See Toon_Renderer. |
|
|
|
When scaling a pixel image
smaller, sometimes this lines get unwanted „steps“ and
artifacts and smooth surfaces look less smooth. So some image
programs (and also A:M) can interpolate the pixel color between
neighbor pixels to smooth the overall look of the image. When you
render out an image sequence with A:M, you can tell the software
to „smooth“ the final image with an anti-alias step.
Though the images most times look more appealing, they consume
more time to render. |
|
|
|
Load/Save for synchronizing actions with sound. |
|
|
|
Beveling, Bias_Handles, Birds, Blobbies, Bloom, Bone, Bone_Hierarchy, Boolean_Cutter, Bump_Map |
|
|
|
When modeling, make those edges and corners a little bit
„round“ for a more natural look. In real world edges
are never perfectly sharp, or (as Yves says) we would cut our
hand daily on every thing we touch. |
|
|
|
Change the way, how a spline (or splines) run through a
control point. Either select a control point, and edit its alpha,
gamma, magnitude in the Properties_Window.
Or show the Bias Handles and mouse drag (solo or with pressed
CTRL or SHIFT key) the handles. |
|
|
|
HowTo: PWT / Choreography / New /
Flocking / Birds |
|
|
|
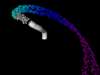
Blobbies is a special kind of Particle_System
which creates particles that are nearly round shaped and thus
look like bubbles. You can simluate things like lava, water, snow
and even fire with blobbies. E.g. you can control the blobbiness
(how quick flow two bubbles together, when they touch), or size
(radius) of bubbles at birth / death. You can control the color
of the bubbles over their livetime. |
|
|
|
A setting in the render panel when you do a final render.
Simulates the behavior of real-world film material where slightly
over-exposured (bright!) areas tend to bleed into darger regions
of the film. This improves the 'film-look' of your
animation. |
|
|
|
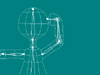
You can control a set of Control_Points
(which build the flesh around the bone) very convenient by the
insertion of a bone. Bones can be arranged to build a
Bone_Hierarchy – also called a
Skeleton [??? is that true?]. If you then
also add Constraints to the bone
hierarchy, you have a Rig [??? is that
true?]. |
|
|
|
Bones can be arranged to build a Bone_Hierarchy
– also called a Skeleton [??? is
that true?]. The hierarchy defines, how the movement of one bone
affects other bones (up and down the hierarchy). See screenphoto
at the right for a simple human bone hierarchy. |
|
|
|
Inside a model a boolean cutter Bone cuts
its geometry from the geometry of all geometry shapes controlled
by other bones (of the same model!). By this means very complex
shaped objects are possible. |
|
|
|
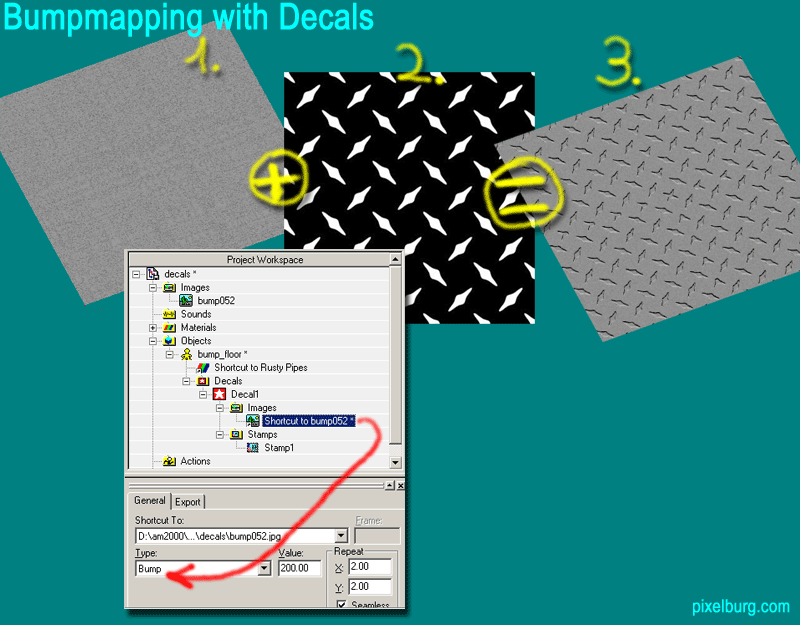
A bump map is an easy way to add natural looking dents and
bumps to an otherwise artificial plain-looking surface. There are
two ways to apply bump maps to a patch: Either as a special kind
of Decal or as an option to a Material.
White pixels of the map bump the surface towards the camera. To
make gradual bumps, use shades of grey. For example use your
image softwares 'Gaussian Blur' to smooth the bump map. |
|
|
|
Camera, Cartoon_Renderer, Caustics, Channel, Cho, Choreography, Cloth_Wizard, Compensate_Mode, Constraint, Control_Point, Cookie_Cut_Map, Creases, Crowd, |
|
|
Your view into the virtual world. There are numerous settings
for a camera, like e.g. focal length, Motion_Blur,
Depth_of_Field. You also have the
coice between a perspective and a non-perspective camera, where
the latter is important for game developers when designing game
backgrounds. |
|
|
|
See Toon_Renderer. |
|
|
|
Aka „Underwater Caustics“ – describes the
artificial simulation of above-water-light shimmering on
underwater surfaces. When the light travels through the surface
waves of the water, it is focused in repeating patterns. The
patterns move, as the waves (or the light) move and these
highlight patterns then show up on all the underwater
surfaces. |
|
|
|
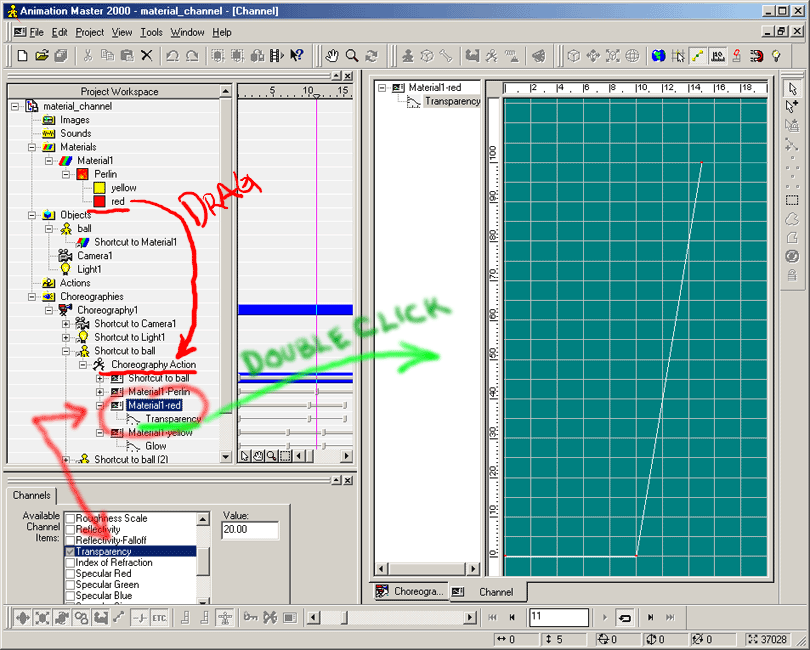
Nearly every parameter of an A:M-Object (e.g. Model, Material,
Light, ...) can be animated over the time axis. So you can e.g.
animate the rotation angle of a bone, the transparency of a
material or the color of a light. When you set the parameter value
at the keyframes, A:M interpolates the parameter values at the
In-betweens. A parameter changing over
the time has an associated 'channel'. You can open this
„parameter-channel“ and tweak and tune the parameter
afterwards. |
|
|
|
Abbreviation for Choreography. |
|
|
|
Aka „Cho“. In a choreography you assemble all of
the building blocks to the final animation. You insert Camera,
Lights, Models, etc.
into your cho via drag'n'drop. You add ready build Actions
to the models, you add pathes to the choreography and force
models, lights or cameras to these pathes via Constraints....
and many more. |
|
|
|
With the Cloth Wizard, it is possible, to automatically insert
a Spring_System (masses and springs)
for (part of) a model that is meant to be a piece of cloth. All
the controlpoints become masses, all the interconecting splines
between these masses become springs. While you also can achive
this manually, the cloth wizard makes cloth at the 'speed of
light'. |
|
|
|
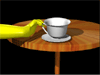
The Compensate Mode is needed immediately before you apply a
Constraint. The compensate mode
automatically calculates offset values for the constraint, so that
objects don't suddenly jump to their constrained position. An
example: You have a hand that wants to pick up a coffee cup. You
bring the hand close enough to the cup, then turn on the
'Translate To' and 'Orient Like' constraints, so that the cup will
from now on follow the hand. The cup jumps immediately to the
constrained hand bone an now moves together with that bone. The
jumping cup looks wrong. |
|
|
|
A 'Constraint' forces or allows the movement of a Bone.
A constraint is e.g.: Aim At, Kinematic, Path, Translate To,
Orient like, Aim Roll At, Spherical Limits, Surface, Scale Like,
Path and Scale to Reach. You can apply a constraint in an Action,
a Choreography or a Pose.
A few examples: with a spherical limits constraint you can
prohibit a human knee joint to bend forward in an unnatural way;
with an aim at constraint you can force the camera to follow a
moving object; with a path constraint you can force an object to
travel on a spline path. |
|
|
|
Control Points (or: Spline Points, abbreviation: CP ) are
points in the three dimensional space, where Spline
curves travel through. So the 3D positions of the controlpoints of
a spline together with the Bias values
of each point completely define the way of the spline.
Controlpoints and spline curves don't render on their own! They
only render when they build a Patch. |
|
|
|
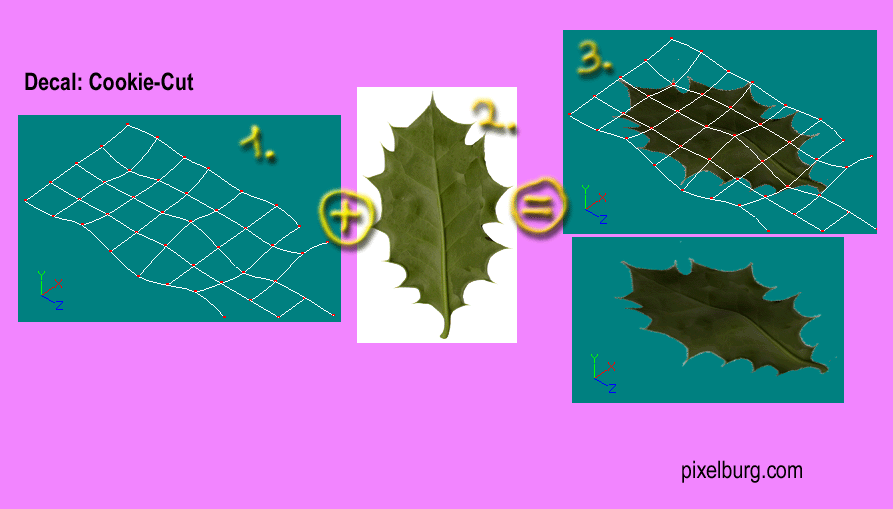
A cookie cut map is a pixel image that is applied as a special
kind of Decal. You can think of them as a
combination of Color Maps and Transparency maps. When the cookie
cut map is applied to a patch it cuts away its transparent part
from the shape geometry it is decaled on – and adds its color
(of its non-transparent parts) to the object. |
|
|
|
Abbreviation for Control Point. |
|
|
|
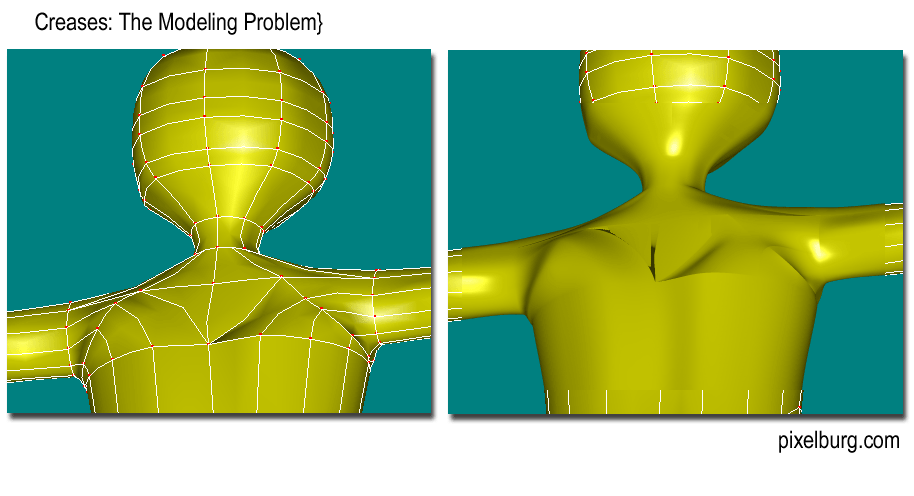
Creases are mathematical artifacts, that are (in most cases)
unwanted. They mostly show up, when a patch surface is forced to
squeeze into a narrow corner, or if you use 3 point patches or 5
point patches a lot, so that these meet each other on the surface.
4 point patches are much more robust against creases. A:M experts
tell, that one day your skill grows, you automatically avoid
creases by modelling 'the right way'. Up till then: good
luck... |
|
|
|
A special kind of Flocking where the
models are not moved by the flock-system and can be stationary
locked to a terrain surface. |
|
|
|
Decal, Default_Bone, Depth_of_Field, Direct3D, Distortion_Mode, Dictionary Dopesheet, Dust, Dynamics, |
|
|
|---|---|---|
|
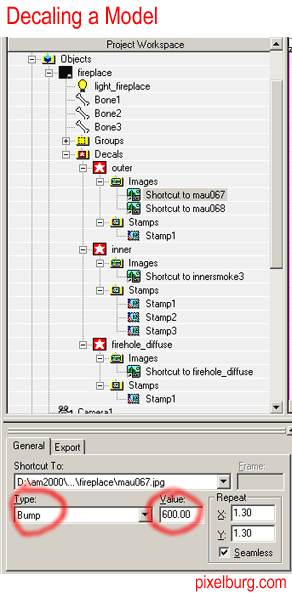
Decals (sometimes called 'Textures') are 2D pixel images
stamped on the surface of 3D Patches. Decals
are an easy way to add a huge amount of reality to your models.
There exist different types of decals like: color, Bump,
transparency, reflectivity, diffuse, specular, ambiance, mirror,
gradient and Cookie_Cut. The type of
the decal defines, how A:M interprets the pixel information in the
image. It is possible to stamp e.g. a color map, a bump map and a
specular map in one step. |
|
|
|
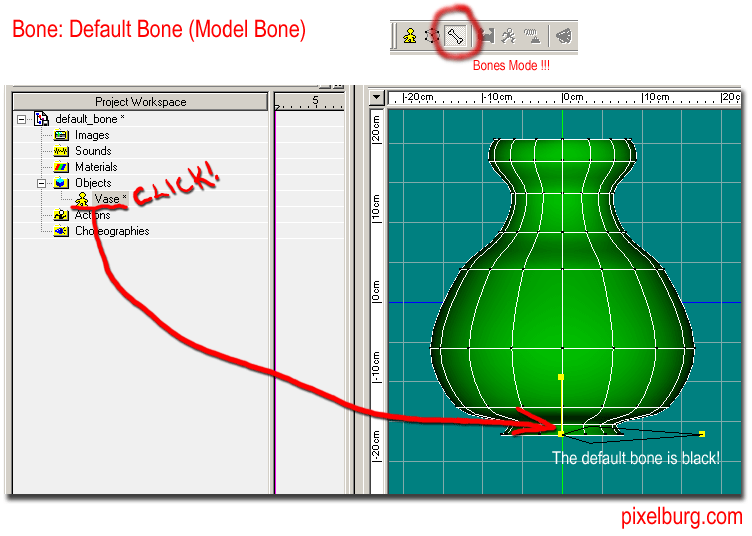
Every Model has at least one Bone:
the default model bone (aka 'Model Bone') – even if you did
not add any bones so far. The default bone defines the 'origin' or
zero-position of the model, when you work in a Choreography.
E.g. if you add a 'Path Constraint' to your model, while in
Choreography-Mode, the default bone is forced on that path and the
model moves with its default bone. Sometimes it's necessary to
change the location or orientation of the default bone inside a
model (e.g. if you need a different offset for your choreography
constraints). |
|
|
|
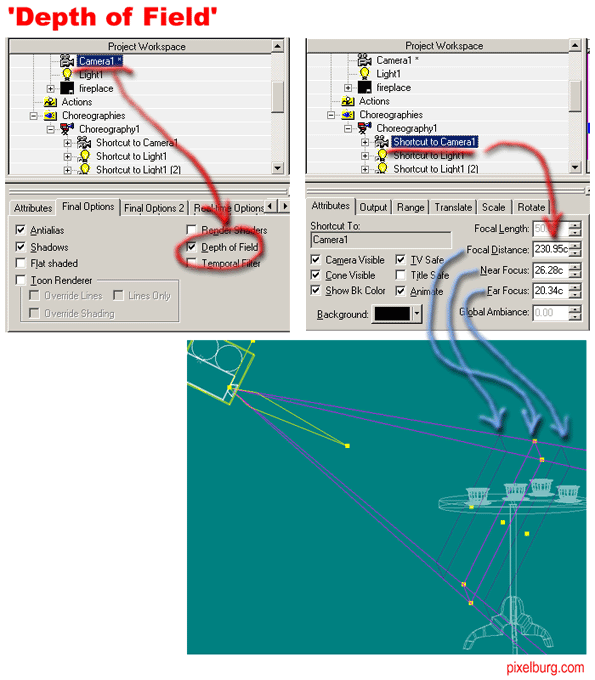
Depth of field is an effect that happens to images taken with
real-world lens systems, when you use rather wide open lens
apertures. Then objects behind or in front of in-focus objects
become more and more blurry. Depth of field is used by real-world
camera men / directors to draw the audience's attention to some
special part of the scene by unsharpening the other parts of the
scene. |
|
|
|
When using the Dopesheet feature, AM
has to break down your entered sentences to words and the words to
Phonemes. This is done by looking up the
words in the dictionary file. The dictionary file (dictionary.dic)
is a normal ASCII-text file, stored in the main AM program
directory and has over 170,000 entries. At the moment the
dictionary is only available in English. |
|
|
|
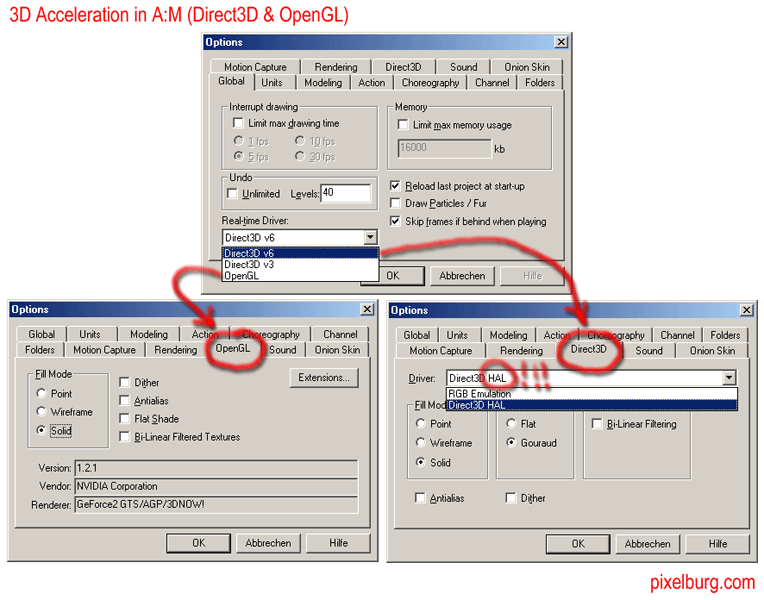
Direct3D is a Microsoft API (Application Programmers Interface)
for fast 3D graphics under the Windows platform. Direct3D is
part of DirectX, which is a low-level API mainly for game
developers, to get direct and fast access to the machines
hardware. |
|
|
|
When inside modeling mode, pr |
|
|
|
The dopesheet feature is very useful for making a figure move
its mouth Lip Sync to a voice sound file.
You can enter a sentence and via the (extensible) Dictionary
Animation Master breaks down your sentence into Phonemes
and translates these phonemes to the desired character Poses
(according to the Preston Blair
phoneme set). Some tweaking and fine tuning is needed afterwards –
but this feature makes lip syncing a breeze! |
|
|
|
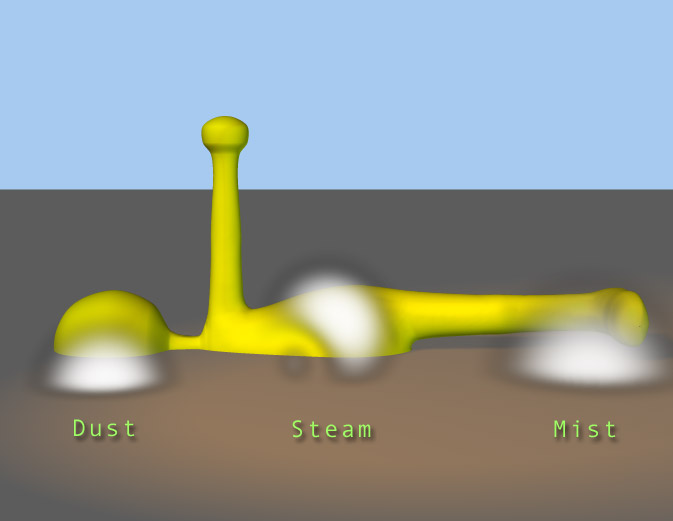
Dust is a Volumetric Effect
that simulates little clouds of dust that are e.g. by footsteps or
car wheels on sandy ground. For more information and examples see
entry Volumetric Effect. |
|
|
|
See Rigid Body Dynamics and Soft Body Dynamics. |
|
|
|
|
||
|
Action Ease, Constraint Ease. |
|
|
|
See: Alien Warrior |
|
|
|
|
|
|
Fall_Off, Film_Grain, Flocking, Force_Object, Frame_Rate, Front_Projection_Map, Fur, FX, |
|
|
|---|---|---|
|
|
|
|
|
|
|
|
|
A bunch of Models, animated semi-automatically. There exist
different predefined flocking systems where the models behave
differently: Birds, Swarm
and Crowd. |
|
|
|
Used to influence the behavior of Particle_Systems,
Soft_Body_Dynamics,
Rigid_Body_Dynamics, Flocking,
, |
|
|
|
Aka „Frames per Second“ or „fps“. The rate
in frames per second at what your animations are rendered. Usual
frame rates are 24 fps (Academy films), 25 fps (PAL European TV),
30 fps (NTSC American TV). |
|
|
|
|
|
|
|
See Particle System. |
|
|
|
See Special_Effects. |
|
|
|
|
||
|
Change the way, how a spline (or splines) run through a control
point. Either select a control point, and edit its gamma bias in
the Properties_Window. Or show
the Bias Handles and mouse drag (with pressed SHIFT key)
the handles. |
|
|
|
|
|
|
|
|
|
|
|
See also Named_Group. |
|
|
|
|
||
|
|
||
|
|
|
|
|
|
|
|
|
||
|---|---|---|
|
The (interpolated) images / positions / values between keyframed images / positions / values. |
|
|
|
Aka 'IK' or 'Kinematics'. |
|
|
|
|
||
|
|
|
|
|
Lens_Flare , Library, Light, Light_Gels, Light_Lists, Light_Turbulence, Lip_Sync, Loft, |
|
|
|
A special effect simulating the light reflections of real world lens systems when a real world camera looks into a bright light. |
|
|
|
(also .Libraries), Motion Library, Model Library. |
|
|
|
Types: Bulb, Klieg, Sun. |
|
|
|
Also „Light Projection Gels“. |
|
|
|
|
|
|
|
|
|
|
|
See Dictionary, Dopesheet, Phoneme. |
|
|
|
See also AM_Loft. |
|
|
|
Magnet_Mode, Magnitude_Bias, Map, Masses_and_Springs, Material, Material_Effector, Mirror_Mode, Mist, Model, Model_Bone, Motion_Blur, Motion_Capture, Muscle, |
|
|
|
|
|
|
|
Change the way, how a spline (or splines) run through a control
point. Either select a control point, and edit its magnitude in
the Properties_Window. Or show
the Bias Handles and mouse drag the handles. |
|
|
|
|
||
|
See Spring System. |
|
|
|
|
|
|
|
|
|
|
|
|
|
|
|
Mist is a Volumetric Effect
that simulates a layer of fog lying on the groud e.g. at a spooky
graveyard. For more information and examples see entry Volumetric
Effect. |
|
|
|
A type of „Object“ in A:M. A model might be your
complex character or simply a ball your character is gonna play
with. Inside a model you can save all the Patches
(the surface) that makes up your character, the Bone_Hierarchy
and his Poses. |
|
|
|
See Default_Bone. |
|
|
|
|
|
|
|
Aka „Mocap“. |
|
|
|
|
|
|
Named_Group, Normal, Null, Nurnie, |
|
|
|---|---|---|
|
See . |
|
|
|
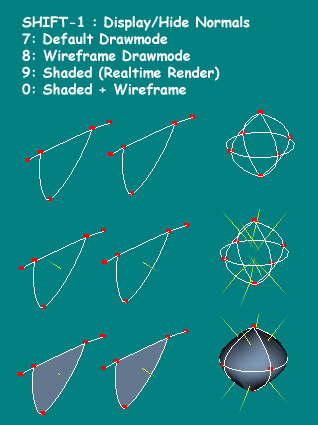
Every infinite small patch has two sides. But only one of these
sides is considered by the A:M software to be the „outside“.
The outside is the side where the „normal indicator“
points outwards. The normals become extremely important when you
should use Rigid_Body_Dynamics
or Soft_Body_Dynamics because
the A:M uses the normals to calculate collisions. |
|
|
|
|
||
|
|
|
|
|
|
||
|
|
|
|
|
|
|
|
|
OpenGL (Open Graphics Library) is an open API (Application
Programmers Interface) for fast 3D graphics under various
operating system platforms. |
|
|
|
Particle_System, Patch, Path_Animation, Phoneme, Physics, Polygons, Porcelain, Pose, Preston_Blair Procedural, Project_Workspace_Tree, Projection_Map, Prop, Properties_Window, Proxy_Model, PWS, PWT, |
|
|
|
A special material attribute. You can create special effects
like water,fire, vulcano lava, sparks, hair and many more with
particles. Though particles create great effects, keep in mind,
that they can increase render-time quite a lot and that the
real-time interface becomes less 'real-timeish' when particles are
used. |
|
|
|
All Models in AM are build of patches for a smooth, natural,
organic look and feel. A patch is the smooth surface build between
3 to 5 Control Points (CPs) in 3D space and the splines between
these points. Whenn the points move, so do the splines and thus
the patch bends and twists. Most times a patch has 4 CPs but even
3 point patches render. |
|
|
|
See also Constraint. |
|
|
|
See Dopesheet , Dictionary, Preston_Blair. |
|
|
|
See Rigid Body Dynamics and Soft Body Dynamics. |
|
|
|
|
|
|
|
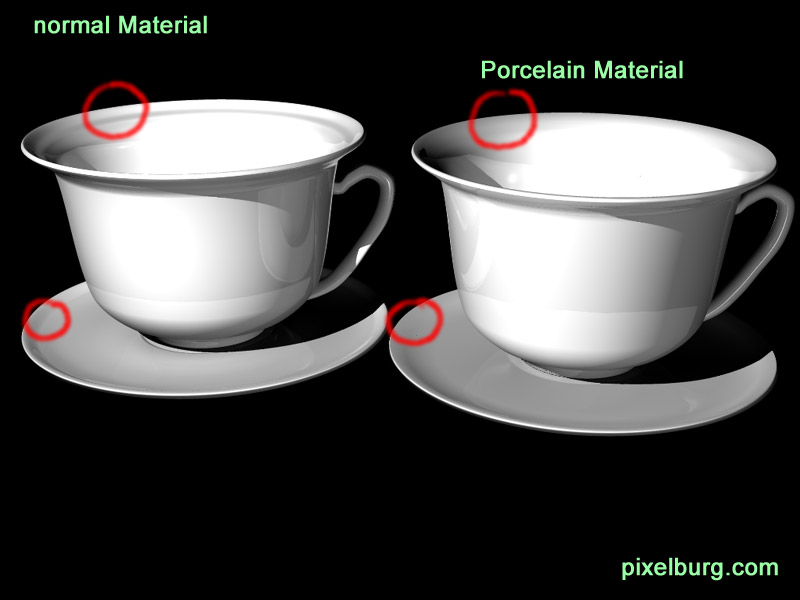
A special Material provided by Hash
Inc., to simulate the ultra-smooth appearance of glazed ceramics.
Therefore the surface normals are averaged so that the surface
becomes even more smooth – but some details may get lost, and
shading quality may suffer. |
|
|
|
|
|
|
|
Preston Blair was a famous US cartoon animatior. Born in
California, he lateron was involved at the Disney Studios (e.g.,
Mickey Mouse in Fantasia's 'Sorcerer's Apprentice') and MGM (e.g.,
Tex Avery) and lateron e.g., „The Flintstones“. He is
autor of the famous „Cartoon Animation Book“, for
self-studying toon animation. Preston died in April 1995 at the
age of 85. |
|
|
|
|
|
|
|
Spherical, Cylindrical and Planar. Do not confuse with Front_Projection_Map. |
|
|
|
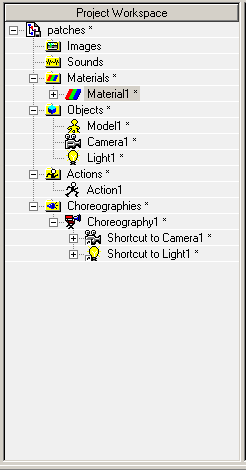
The hierarchical tree on the left of your A:M program window,
which shows all the used building blocks of your project. |
|
|
|
|
|
|
|
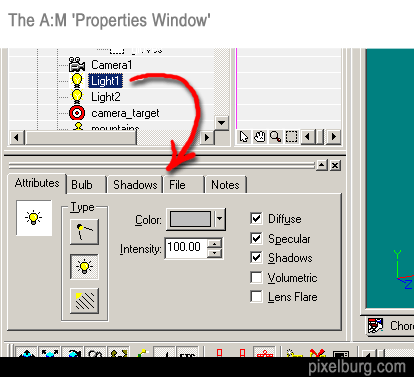
Almost any settings for the individual parts of your animation
can be viewed/ changed in the properties window. Just select an
object by a single mouse click in the Project_Workspace_Tree
and view how the properties window changes its contents. |
|
|
|
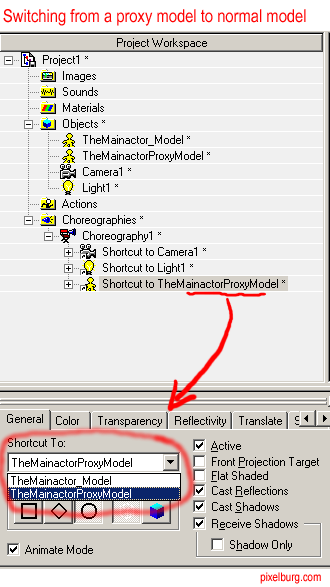
For a complex model (like your main actor), it's a good idea,
to create a proxy model with the same outer dimensions, same bone
hierarchy, but with much less patches and without textures and
Nurnies etc. |
|
|
|
Abbreviation for Project_WorkSpace_(Tree). |
|
|
|
Abbreviation for Project_Workspace_Tree. |
|
|
|
||
|---|---|---|
|
??? |
|
|
|
See Real_Time_Rendering. |
|
|
|
Radiosity, Real_Time_Rendering, Refraction, Rig, Rigid_Body_Dynamics, Roll_Handle, Root_Bone, Rotoscope, |
|
|
|
|
|
|
|
Aka „Quick Shaded Mode“.
To get a more „solid“ look while modeling, you can
switch the Model window in „Shaded“ mode. In Shaded Mode
A:M subdivides every patch into polygons which are then shaded in
some sort of a „quick draft“ mode while you turn, scale
and edit your model. |
|
|
|
See also Caustics. |
|
|
|
Similar to Skeleton??? Differences between Rig and Skeleton?? William Eggington says: „A rig is a system of bones and constraints that assist you when you wish to animate a character or model.“ |
|
|
|
|
|
|
|
|
||
|
|
|
|
|
|
|
|
|
SFX, Shaded_Mode, Shadow, Shag, Skeleton, Skewing, Smart_Skin, Soft_Body_Dynamics, Special_Effects, Spherical_Angle, Spline, Spring_System, Steam, Stereo_Rendering, Storyboard, Streaks, Stride_Length, Swarm, |
|
|
|
See Special_Effects. |
|
|
|
See Real_Time_Rendering. |
|
|
|
There are different ways in influencing the look of your
shadows. |
|
|
|
[ToDo] |
|
|
|
See Bone. |
|
|
|
|
|
|
|
[ToDo] |
|
|
|
|
|
|
|
|
||
|
|
|
|
|
See also Control Point and Patch. |
|
|
|
|
|
|
|
Steam is a Volumetric Effect
that simulates little vapor coming from a hot cup of coffee or
from a burning cigarette. For more information and examples see
entry Volumetric Effect. |
|
|
|
|
|
|
|
|
|
|
[ToDo] |
|
|
|
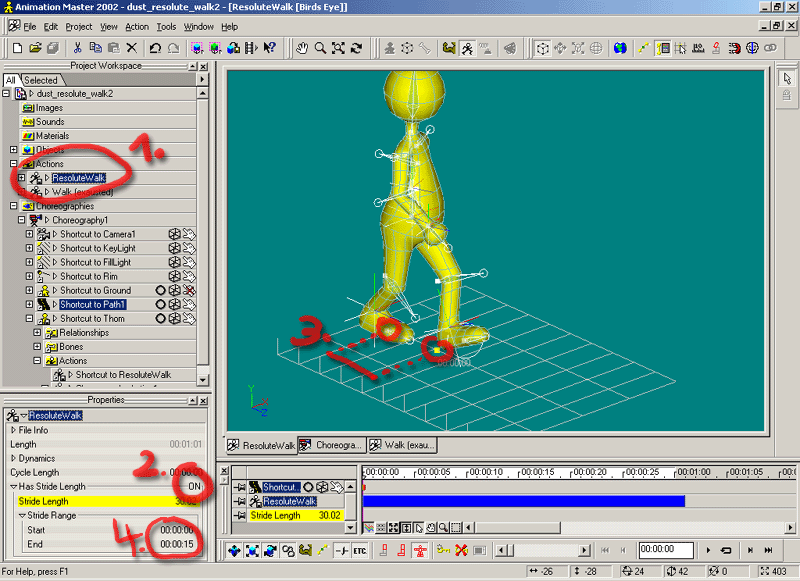
Aka „Step Length“ is a setting of an Action.
When you want a character to walk (or run, or jump, or drive)
along a path, you have to tell AM, how far your object should
advance on it's path with every step it takes. If the progress on
the path does not fit to the step length, the characters feet slip
over the ground in an unnatural looking way. HowTo: select
the action in the PWT
(step#1) and switch the „Has Stride Length“ setting to
„ON“ (step#2). A little ground-grid is displayed beneath
your character. If you click on the grid, two little sqare handles
indicate the extremes of a step – drag them to match your
charater's action (step#3). Finally adjust the time, each step
lasts (step#4). See image on the right for a step-by-step
screenphoto. |
|
|
|
A special kind of flocking where the models are moving randomly
like a swarm of bees or leaves. |
|
|
|
Texture, Timeline_Window, Toon_Lines, Toon_Renderer, Toon_Shader, |
|
|
|---|---|---|
|
|
||
|
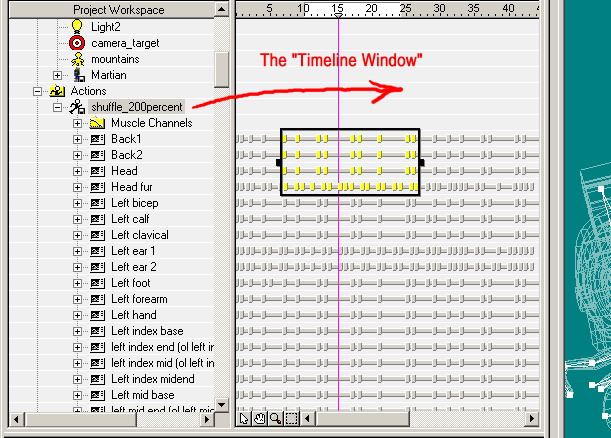
In the „Timeline Window“ you can view / change the
time positions of the keyframes of your animation. In the title
bar of the timeline you can see the frame number (or time
position) and in the area below every horizontal grey line
indicates an object with at least one keyframe and every grey
little block an that line indicates a keyframe. The keyframe
blocks are inserted automatically by A:M, when you select Edit /
Make Keyframe. |
|
|
|
See Toon_Renderer. |
|
|
|
A special render setting in A:M which allows you, to give your
animations a 'cartoonish' look. With the 'Toon Lines' setting you
e.g. can specify that the outlines of your shapes should get a
black border. With the 'Toon Shader' you can specify that the
shapes are not shaded smoothly, but e.g. only with two colors: the
object color and a shadow color. |
|
|
|
See Toon_Renderer. |
|
|
|
|
||
|
The UV Decals are used to correctly bend and twist decaled surface images while your underlying model bends and twists. So UV is more a “mathematical” thing and the end-user shouldn't care about it. See Decal. [??? is this correct?] |
|
|
|
See Caustics. |
|
|
|
|
||
|
|
|
|
|
Volumetric effects are little animatable clouds of
micro-particles for effects like Dust, Mist,
Smoke, Fog and Steam. You can control
parameters like e.g. „Color“, „Swirl“ or
„Turbulence“ to achieve your desired effect – you
can even animate these parameters over time. Volumetric effects
add a lot of realism and atmosphere to your scenes, but require
additional rendertime. |
|
|
|
|
|
|
|
|
||
|
|
|
|
|
Abbreviation for 'Work in Progress'. |
|
If you want to link to this page,
you may use the
official 'A:M Glossary' logo![]()
http://www.pixelburg.com/am_glossary/
© 2000 by Wolfram M. Eßer. - The copyright to the above glossary with its explanations, images, movies and examples is owned by Wolfram M. Eßer. Private, non-commercial usage is allowed. Commercial usage first needs a written permission. The yellow „Thom“ figure and KeeKat are © Hash.
The names and trademarks on my pages are
owned by their individual companies. „Hash“ and „Animation
Master“ are trademarks of „Hash
Inc.“. „Windows“, „Direct3D“,
„DirectX“ are trademarks of Microsoft Corp., „Macintosh“
is trademark of Apple Corp.
Visitors
since 2001-01-01